DNA Sample Collection Guide Using the Home Test Kit
Our kits contains the sterile oral swabs, the instructions and everything you need to efficiently complete the home DNA sample collection.
The below highlights the sample collection procedure that you will need to follow when doing your DNA test.
The basics of our home kit
EasyDNA has created a home sample collection kit. Using this home kit you will be able to collect your DNA samples. The kit is easy to use and contains what you require to collect the samples. Advanced methods of DNA extracting enable scientists to extract DNA collected by using oral swabs. Our kits contain oral swabs for the sampling of 3 people.
Given that our kits are pre-packed with swabs for 3 people, you may have extra swabs inside your kit which will not be used if two or less people are taking part. You may simply dispose of any extra swabs you will not be using.
Inside the kit you will find 3 different envelopes and in each of these, mouth swabs .
Precautions
Eating, drinking or smoking must be avoided for 1 hour before sampling. This will ensure that there will be no degredation or contamination of DNA by food substances or chemicals found in food, cigarettes etc…
How are DNA samples collected?
Our DNA test kit contains oral swabs (also called “buccal swabs”). Watch our brief sample collection video to learn how to collect your samples or read the more detailed step by step instructions below.
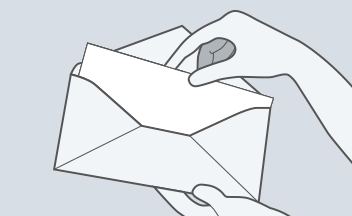
Step 1
Remove the oral swabs from the plain envelopes in the DNA test kit.
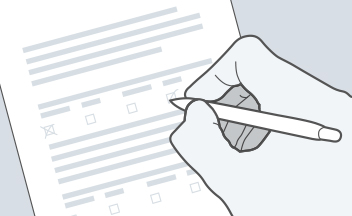
Step 2
Once you have removed the swabs, the envelopes need to be filled in with some basic information. You also need to fill out the consent form you find inside the kit.
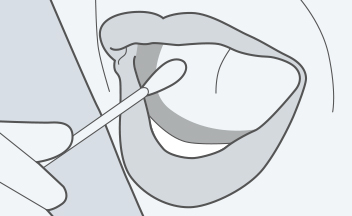
Step 3
With clean hands, proceed to rub firmly the swabs for about
1 minute inside the mouth against the cheek to collect saliva sample. This action should be firm but not aggressive and should not be uncomfortable. Remember to use all the swabs provided for every person.
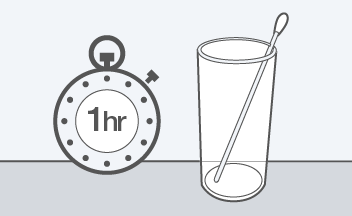
Step 4
Allow the swabs to dry for an hour. Tip: You can place them upright in a clean glass. Once they are dry you can return them to their corresponding envelopes. Make sure that at no time do swabs from different people come into contact with one another.
Step 5
Once you have completed all previous steps, place the swab envelopes and the consent form into the larger pre-addressed envelope. Please remember to attach sufficient postage stamps and send your samples off for analysis. We recommend using courier or tracked mail service for traceability purposes.
Cannot wait? Need to collect samples ASAP?
Our kit takes around 2 working days to arrive to your chosen address. If you need to collect oral swab samples but are pressed for time, you can actually assemble your very own kit in just a few steps. We will even deduct a small fee as you will not be using our kit. You can purchase swabs from a pharmacy or even use cotton buds if you are not able to purchase them from a pharmacy. If you do use cotton buds, you need to cut off one of the cotton-ended parts. Learn how to make your own home kit now.
Tips
- You may allow swabs to dry by either placing them in a shallow glass in such a way that there is no contact between the glass and the cotton ended part of the swabs. You can also leave them on a clean surface with the cotton ended part of the swab jutting over the edge. You need to be careful to keep swabs from different people apart.
- You can collect samples even from babies. Sample collection is absolutely painless. You need to avoid feeding for 1 hour before sampling for babies and todlers too.